Windows 10 comes with Cortana, a voice assistant. Many users, including me, don’t satisfy with this feature. Android has Google Assistant, and almost every user likes it.
This is AI-based technology and will no longer be available for windows in the future. But I will guide you on how to get google assistant on Windows 10?
Since it is not available for Windows, therefore we have to follow a lengthy procedure to get this feature in Windows 10. Cortana is a Microsoft product, while Google Assistant is the product of Google. This assistant comes with a lot of features, tips, and tricks.
Moreover, it helps us to schedule our tasks. We can perform each and everything task with Google Assistant, and that’s why many users prefer this feature over Cortana.
Prerequisites
Before installing the Google Assistant on Windows 10, you must satisfy the given requirements:
- Python Software
- Windows 10 OS
- Gmail Account
Note: Make sure that you have use the same Gmail id throughout the process; otherwise, you will not be able to install Google Assistant on Windows 10.
Also Read: How to Change Drive Icon in Any Windows Operating System?
1) Download And Install Python Software
Now, we will fulfill our first requirement. I will teach you how to download, install, and configure the python software on your Windows 10. So, let’s get started:
1) Go to the official Python site.
2) Navigate to Download and click on Windows.
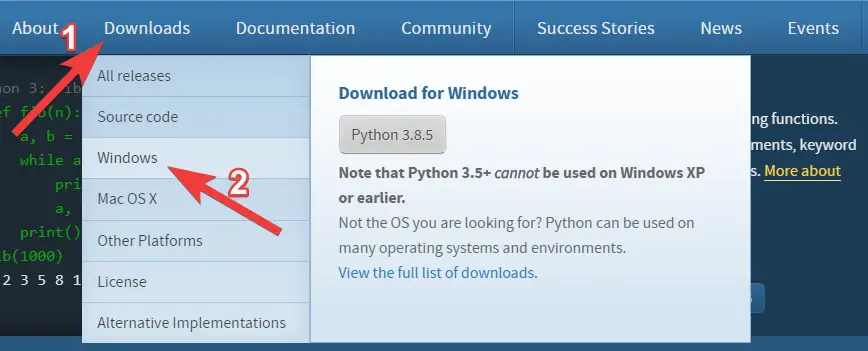
3) Look at the Latest version section and download the executable file according to your windows version (32 or 64 bit) as shown below:

4) After downloading Python, we are going to install it.
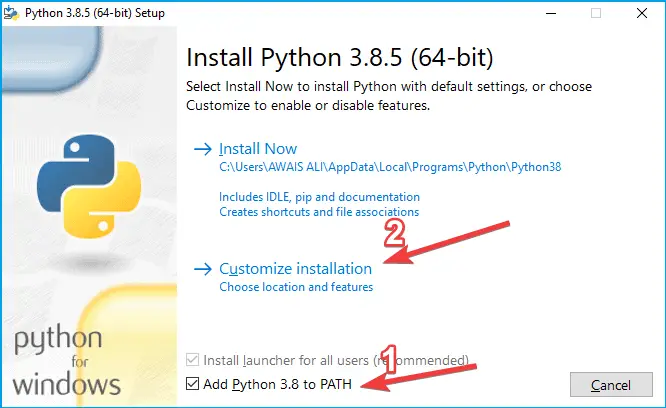
5) Open Python, check to Add python 3.8 to PATH box and choose Customize Installation.
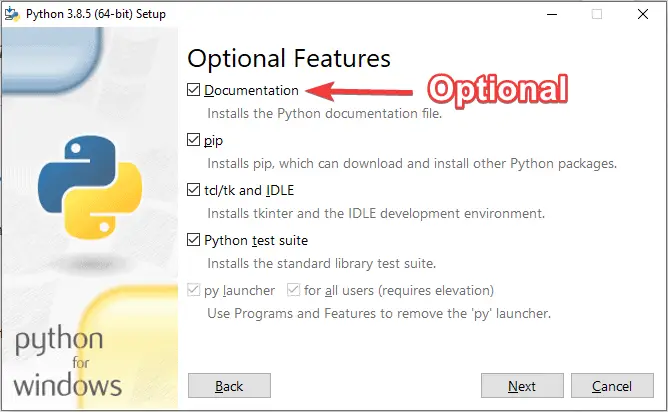
6) Click on Next in this window. You can uncheck documentation if you want since it is optional.
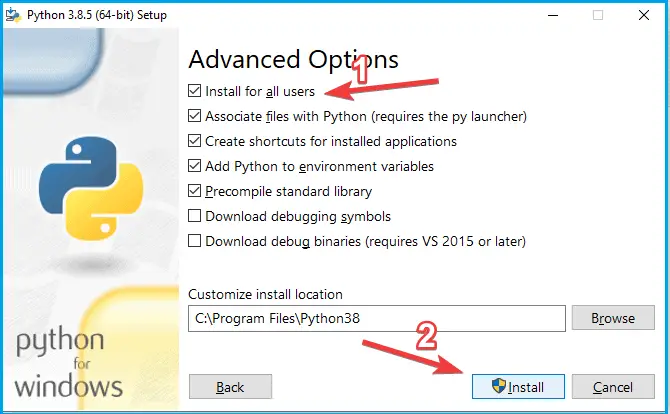
7) Hit on Next. Check the first box “Install for all Users” and click on Install.
8) You have successfully installed Python on your Windows 10.
2) Windows 10 OS
We have fulfilled the first requirement, and the second is you must have Windows 10 installed on your system. You can easily download it legally from the Microsoft Office site.
Once you download Windows 10, the next thing is to Make a Bootable USB Drive. There are many ways to do it as well.
Also Read: How to Do Emojis on Windows 10?
How To Get Google Assistant on Windows 10?
If you have completed the requirements, then, you can follow the next and important procedure to get Google Assistant on Windows 10.
We will split the whole process into parts. You have to follow the instructions as it is if you want this fantastic feature in your operating system.
1) Setting environment variables
In this section, we will make some changes to our Windows 10 settings. These settings are essential for Google Assistant. Let’s dive into it:
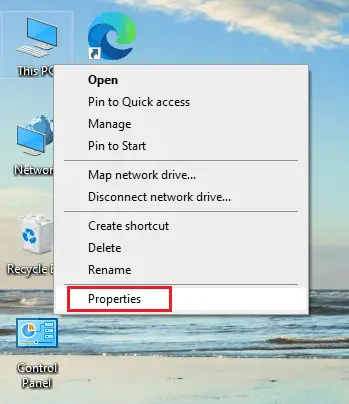
1) Right Click on This PC and choose Properties in the drop-down menu.
2) Navigate to Advanced system settings in the left menu like below:
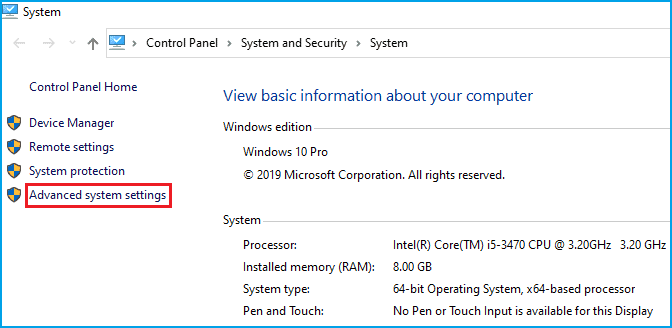
3) A new window will appear, click on Environment Variables.
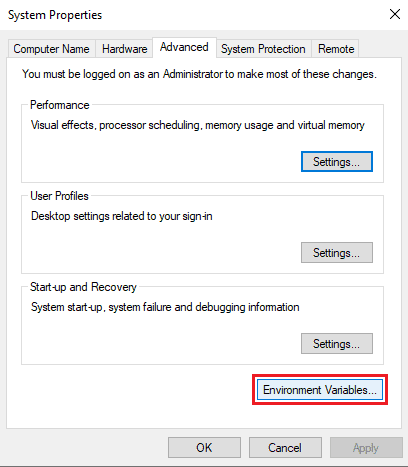
4) Again a new window will pop up. Under System Variables, double-click on Path.
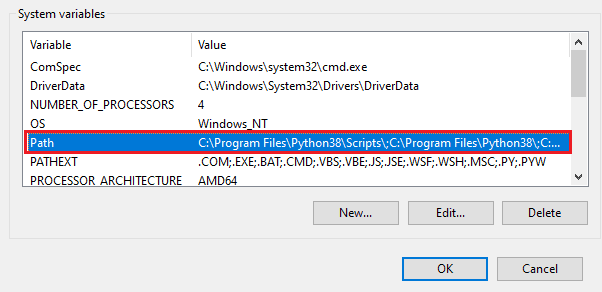
5) An edit environment variable window will appear. Here, you should see the Path of Python software, where you have installed the python software like below:
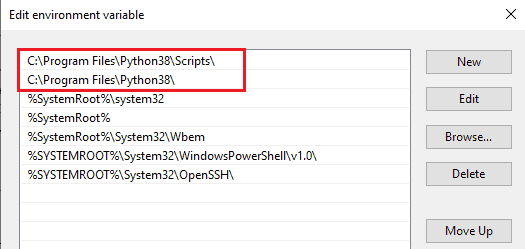
In my case, these are “C:\Program Files\Python38\Scripts\”, and “C:\Program Files\Python38”.
Note: These Paths are automatically created once you install the Python software.
If you can’t find these paths here then, you have to add them manually. Follow the given procedure only if you don’t find them otherwise skip this section and jump to the next:
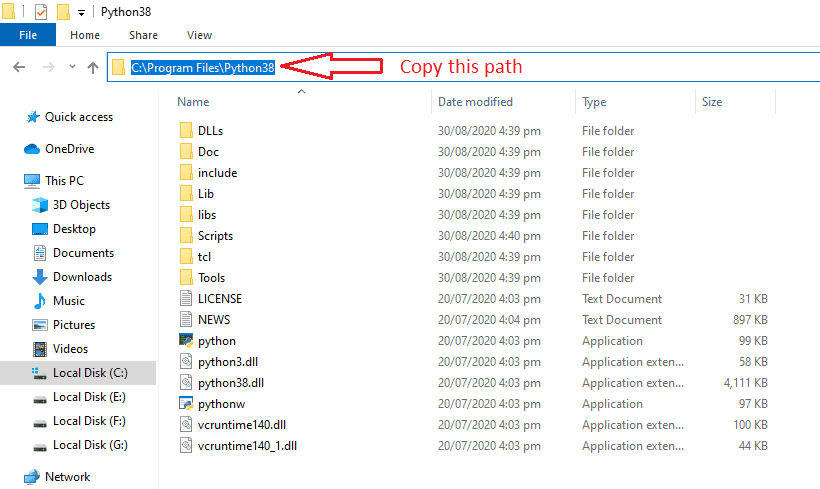
6) Navigate to the directory where you have installed the Python and copy the Path like below:
7) After copying, go to edit environment variables (as shown in step 5) and click on New like below:
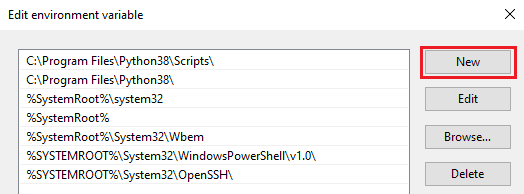
8) Now, paste the copied Path and hit enter.
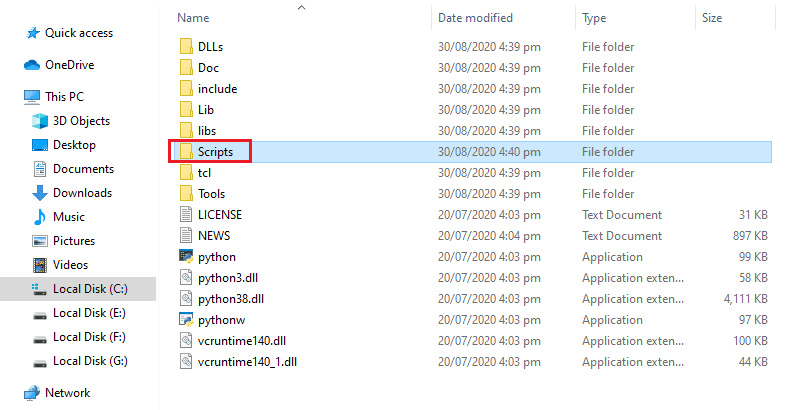
9) Again go to the python directory and click on scripts like below:
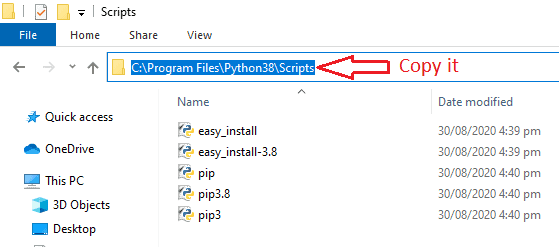
10) Copy the Path of this directory like below:
11) Go to edit environment variables > New > paste the copied Path as we have done above.
12) Now, you have done.
Also Read: How to Open The Task Manager on Windows 10? – 12 Ways
2) Setting up the project in Google Actions and Cloud Console
In this section, we will set up a project in Google Actions and Cloud Console. For this, the whole procedure is given below:
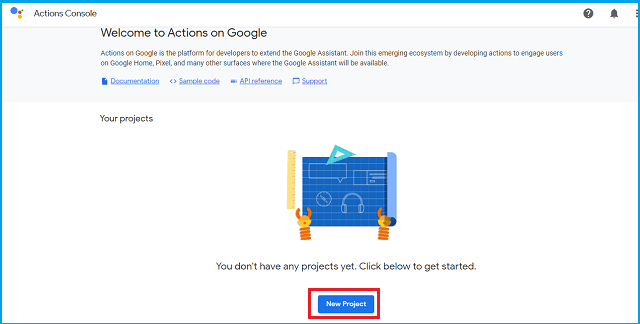
1) Go to Google Action Console. Sign in to your Gmail account if not.
2) Click on New Project like below:
3) A new window will appear. Agree to the terms of service, choose country and then, click on Agree and Continue.
4) Again a new tab will pop up. Type the Project Name and click on create a project.
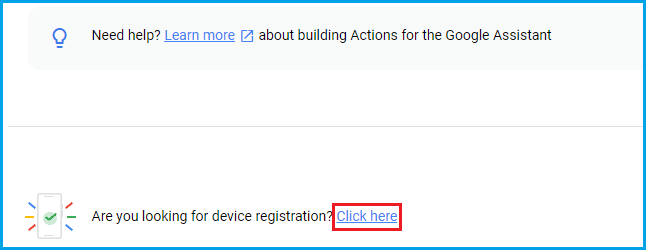
5) Now, scroll down to end and hit on Click Here like below:
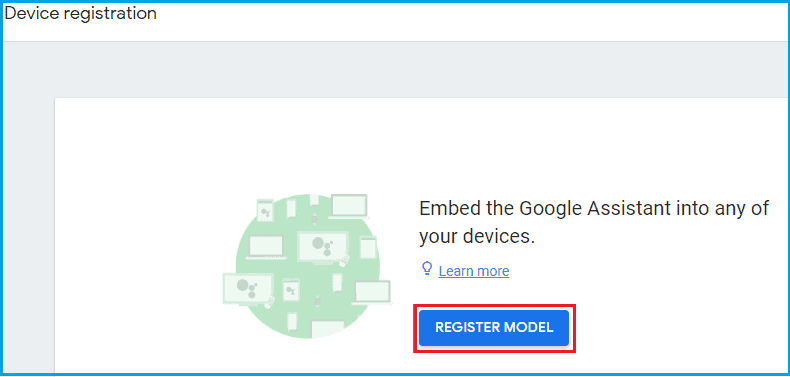
6) Now, wait for some time until a new window will appear. Click on Register Model like this:
7) The type product name, manufacturer name, device type, and click on Register Model.
8) Now, click on Download OAuth 2.0 credentials and click on Next.
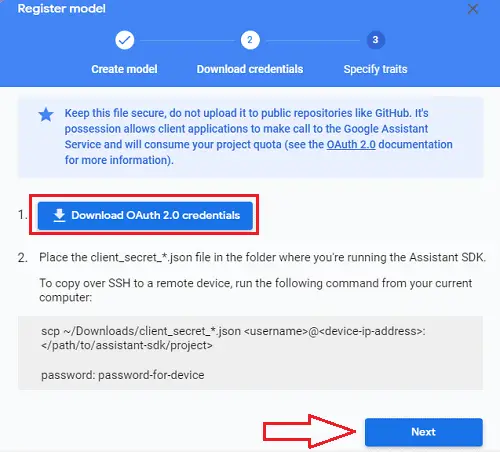
9) In the next tab (specify traits), click on skip.
10) We have done with Actions Console. You can close if you want to.
11) Now, go to Google Cloud Console.
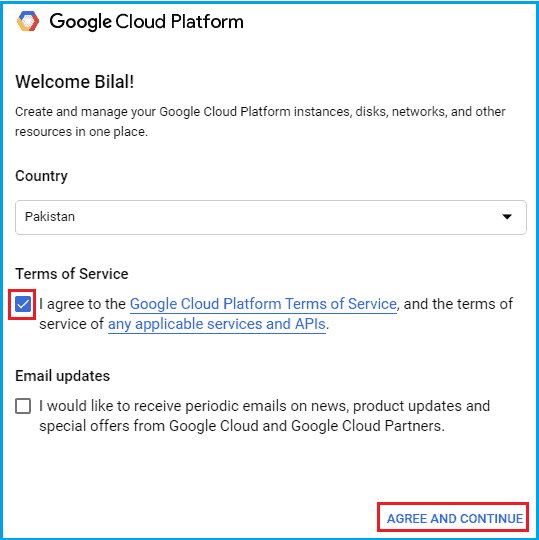
12) Again select country, agree to Terms of Service and click on Agree and Continue like below:
13) Now, click on the drop-down arrow-like below:
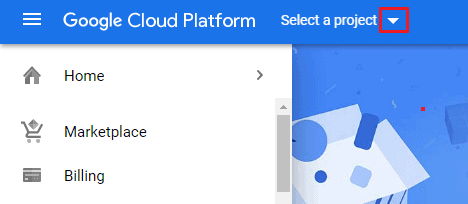
14) Select the project, you have just created in Actions Console.
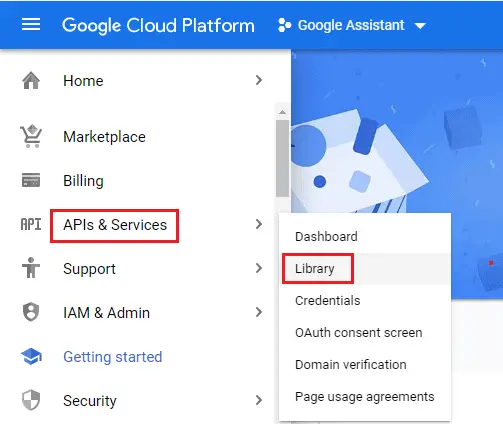
15) In the left menu, Choose APIs and Services > Library and wait for a few seconds
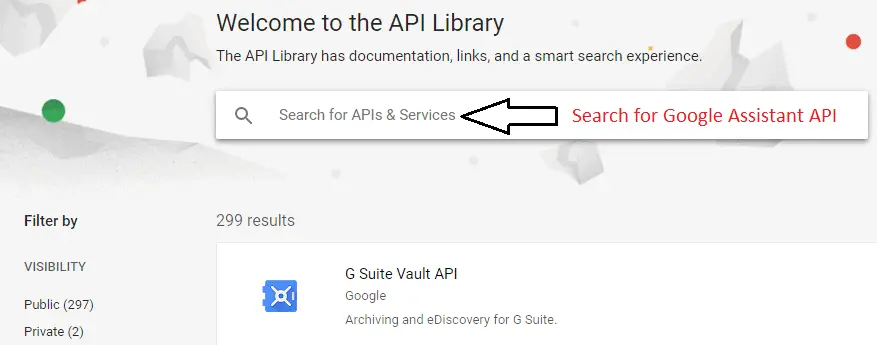
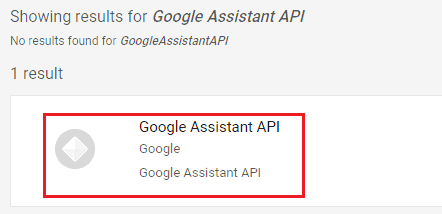
16) Now in the API library, search for Google Assistant API like this:
17) Click on Google Assistant API like below:
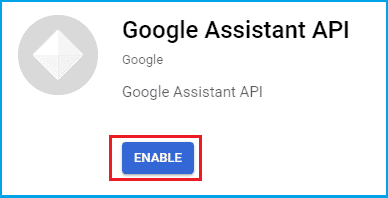
18) When Google Assistant API will open, click on Enable and wait for a few seconds like below:
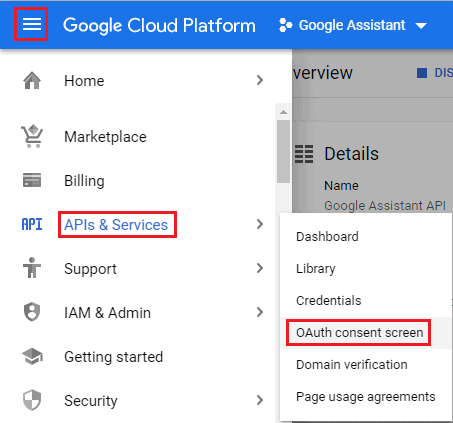
19) After enabling, click on horizontal lines on the top left corner, choose APIs and Services then click on the OAuth consent screen like this:
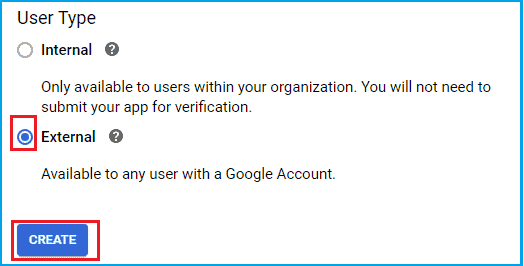
20) A new tab will appear. In User type, select External and click on Create.
21) Again a new window will open. Under the Support Email section, choose your email address.
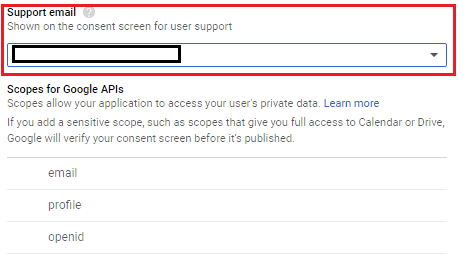
22) After selecting your email, scroll down and click on save.
23) You have done it.
3) Installing Google Assistant
In this section, we will install the Google Assistant by using the command prompt.
So, follow the given procedure very carefully.
1) Type cmd in the Windows search bar and run it as an administrator.
2) Now, we have to copy some commands and paste them into the command prompt one by one. You have to run cmd as an administrator.
3) Copy the following command and paste it in cmd and hit enter like below:
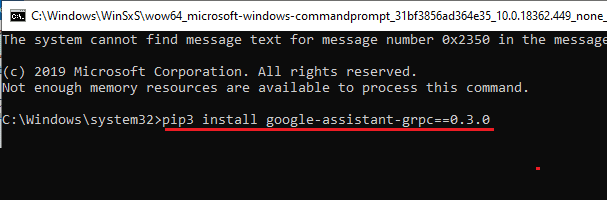
pip3 install google-assistant-grpc==0.3.0
Now, please wait for some time until it downloads some necessary files for Google Assistant.
4) Again, copy the code, paste in cmd, and hit enter.
pip3 install google-assistant-sdk==0.6.0
5) Once again, please copy the below code, paste it in cmd, and hit enter.
pip3 install google-assistant-sdk[samples]==0.6.0
6) Now, Navigate to the directory where you have downloaded the Assistant Credential File (Above section in step 8) like below:
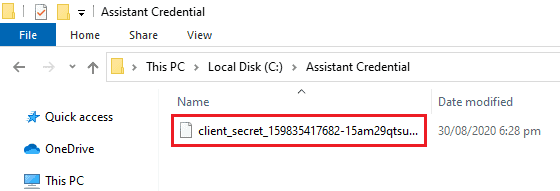
7) Now, copy the file name along with the extension which is .JSON
8) After copying the file name, click on the directory bar (Path) and put a backslash (\) at the end of the Path. Now, paste the name of the file along with an extension, you just copied like below:

9) After pasting the filename, copy the whole Path which includes Path and filename with an extension like below:
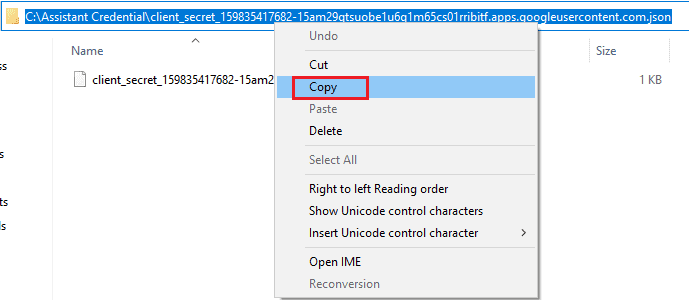
10) Now, put the double quotes around the entire Path, you copied right now, and again copy Path as a whole that includes double quotes, Path, and filename with extension.
11) Save this Path in notepad or anywhere else since we need it in the next step. In my case, the whole Path is this:
“C:\Assistant Credential\client_secret_159835417682-15am29qtsuobe1u6q1m65cs01rribitf.apps.googleusercontent.com.json.”
12) Now, copy the following command and paste it in the cmd. Do not hit enter.
google-oauthlib-tool --scope https://www.googleapis.com/auth/assistant-sdk-prototype --scope https://www.googleapis.com/auth/gcm --save --headless --client-secrets $credname
13) Replace $credname with the Path, you saved in notepad or anywhere else along with double-quotes, Path, and filename with extension. In my case, the whole command will look like this:

14) After replacing, hit enter.
15) Now, it will provide a link. Just copy that link, paste it in your browser, and hit enter.
16) Choose your Gmail account and give all permissions.
17) After Allowing everything, it will give you a code. Copy that code and enter in cmd and hit enter.
18) It will save your credentials.
19) Now, open Activity Control of your Google Account. Sign in if not.
20) Make sure both Web & App Activity and Location History are turned on. If not then, you have to turn them on. It is necessary for Google Assistant.
4) Setting up voice activation for the assistant
This is the last section, and we will be able to use Google Assistant after performing some steps. In this section, we are going to set up voice activation for the assistant. The whole procedure is given below:
1) Download the Voicemacro software.
Note: You must install .NET Framework version 3.5 to install this software in your windows 10.
2) When you begin the installation process, you have to click on Run Anyway and if this option doesn’t appear, click on More Info, and it will appear. The installation process is straightforward as we install other software.
3) Also, download a zip file. Click here
4) After downloading the file, extract that file. You need WinRAR or 7zip to extract that file.
5) You will find two files when you will extract the zip file. Just open the gassist file with Wordpad or notepad. This file will look like this:
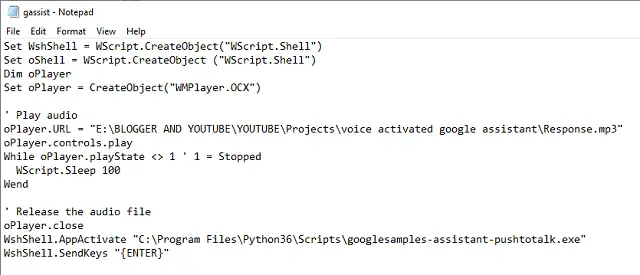
6) In this file (gassist), replace the Path of oPlayer.URL with Response.mp3 Path, you just extracted. In my case, it will become like this:
7) Now, press CTRL+S to save the file.
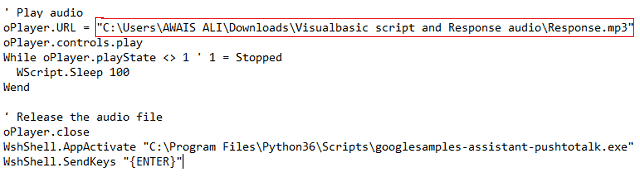
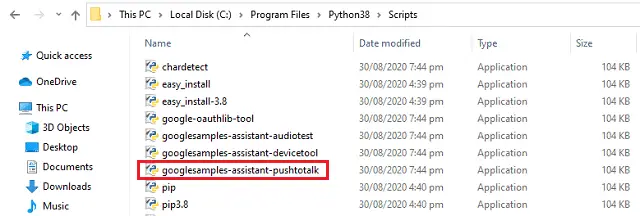
8) Go to the python folder and then, the script folder. Here, you will find the file named googlesamples-assistant-pushtotalk.exe like this:
9) Just copy its Path. Open that file, you opened in notepad, and replace it in WshShell.AppActivate like below:

10) Again, save the file and close it.
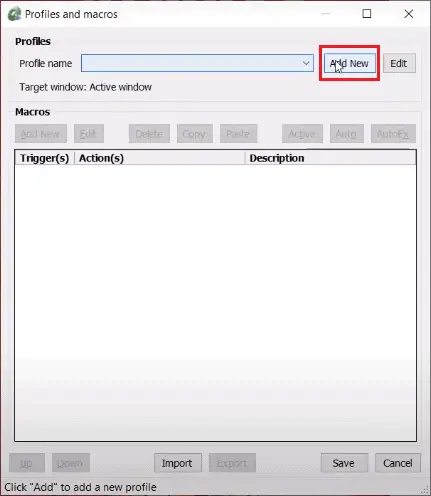
11) Open the software voice macro, you just installed. Click on edit on the above menu.
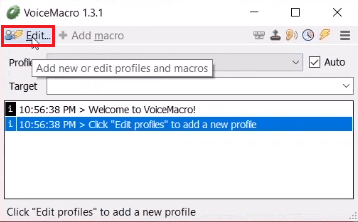
12) Click on Add new as below:
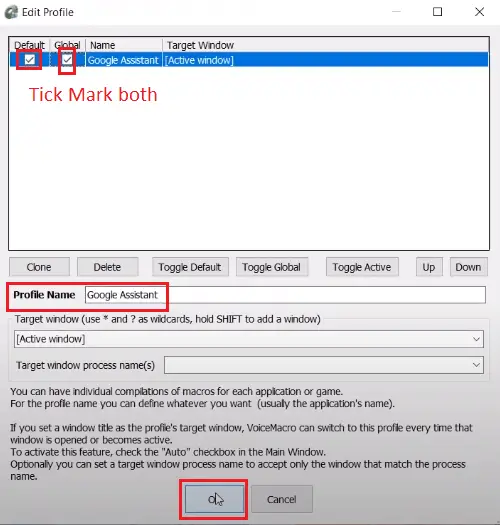
13) Give profile name and click on OK.
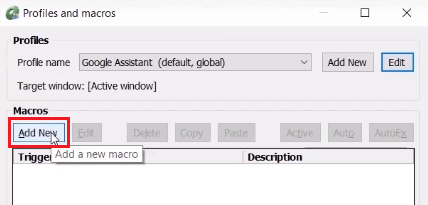
14) Under Macros, click on Add New.
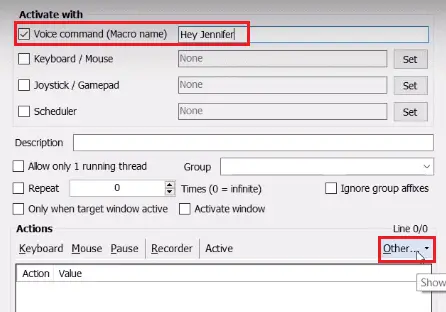
15) Give the Macro Name like Hey Google, OK Google, etc. After that click on other > Execute/Open a file in the drop-down menu.
16) Now, Browse the gassist file, you just edited. In Windows Style, select Hidden and hit on OK.
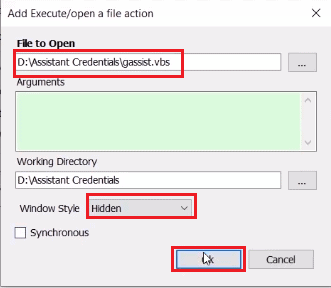
17) Again Click on OK in the next window.
18) Now you have done everything, click on save.
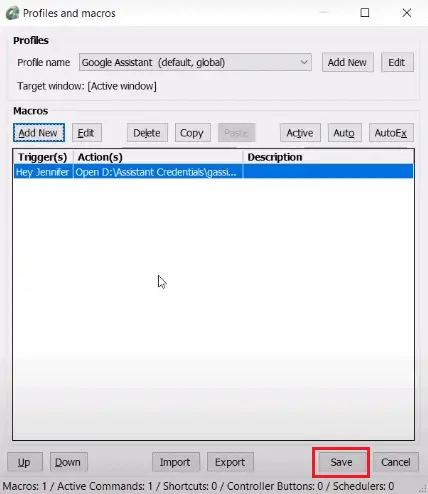
19) That’s it.
Also Read: How to Change WiFi Password in Windows 10?
How to Launch Google Assistant?
Finally, we have done everything. Now, will launch google assistant. Follow the given procedure to open the Google Assistant on your Windows 10 operating system.
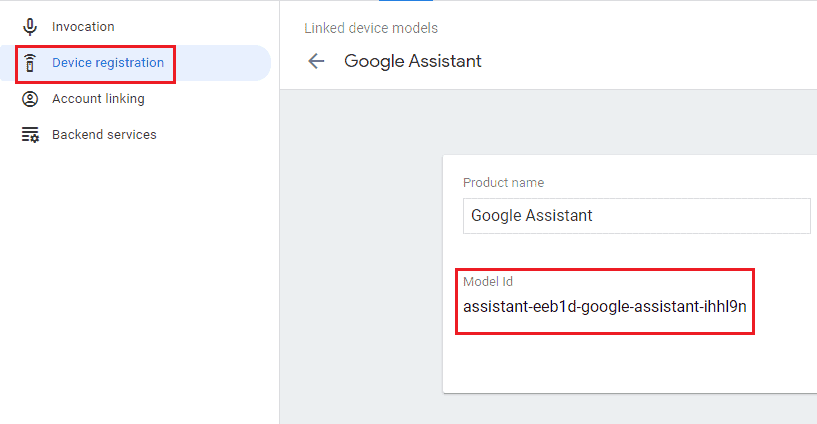
1) Go to your Actions Console screen and copy the Model ID of the project, you just created and saved it in notepad like below:
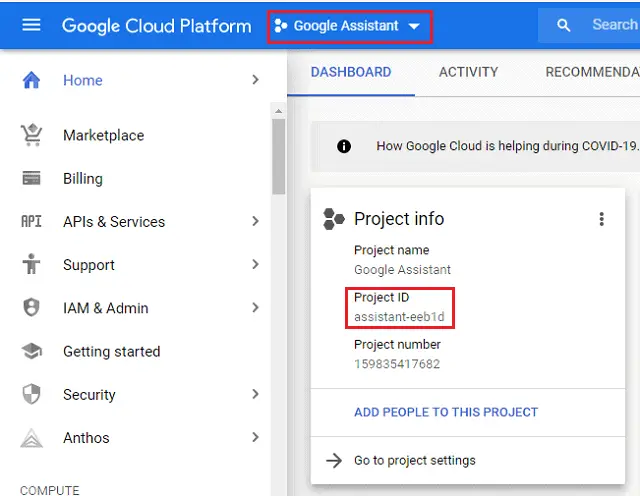
2) Now, go to Google Cloud Console and copy the Project ID, you just created and saved it in notepad like below:
3) Now, go to the python script folder and copy the path of the script folder.
4) Open cmd and type cd and give space and paste the Path you just copied and hit enter. In my case, the command will be:
cd C:\Program Files\Python38\Scripts
5) Now, the Path of cmd will be changed. Please copy the following command and paste it in cmd. Do not hit enter.
googlesamples-assistant-pushtotalk --device-model-id "Insert your model id here from actions console" --project-id "Insert your project id here from actions console"
6) Replace your Model ID and Project ID in the above code in cmd. In my case, this command will be:
googlesamples-assistant-pushtotalk –device-model-id “assistant-eec8d-google-assistant-ihhl9n” –project-id “assistant-eec8d”
7) After replacing codes, hit enter.
8) Your Google Assistant is ready.
How to use Google Assistant?
You are all done. Now, we can use google assistant easily. To use google assistant, follow the simple steps:
1) Open your voice macro software.
2) Go to Python directory > script > open googlesamples-assistant-pushtotalk file.
3) Now, say OK Google or whatever you set during profile creation in voice macro.
4) It will work the same as it does on Android phones.
Note: Your Microphone should be turned on to use Google Assistant.
Conclusion
I hope you have also installed Google Assistant in your Windows 10. I know the procedure is very lengthy, but the result is very fantastic. So, this is how to get Google Assistant on Windows 10.
If you face any issue during the installation, you can comment, and I will try to solve your problem as soon as possible. If you find this article helpful, then share it with your friends and dear ones.