Looking for the best ways to record screen on your iPhone? Recording your iPhone screen can be pretty helpful when you need to share your screen activities with others. Isn’t it?
And since there is no built-in screenshot tool that can take one long snapshot of the whole chat on an iPhone, some may use the recording feature to shoot the scrolling screen, which is much easier than snapping multiple screenshots.
So, how to make a screen recording on your iPhone? Is it possible to capture the sound at the same time?
You can try the following methods to record the screen on your iPhone, iPad, or iPod touch. We’ll show you both built-in and third-party tools. You can pick either one as you like.

So, make sure to read this guide till the end to know the best ways to record the screen on your iPhone.
Best Ways to Record Screen on Your iPhone
We’ll explore these methods to capture our iPhone screen in detail. Let’s take a look at them from a bird’s eye view:
- Use Screen Recording On iPhone
- Record iPhone Screen with Windows/Mac
Method 1: Use Screen Recording On iPhone
In fact, Apple offers a built-in recording tool to capture your iPhone screen right away without installing any other app. Apple released this feature with iOS 11.
1.1 Enable Screen Recording Feature
If you want to use this feature, you should enable it and add it to Control Center before using it.
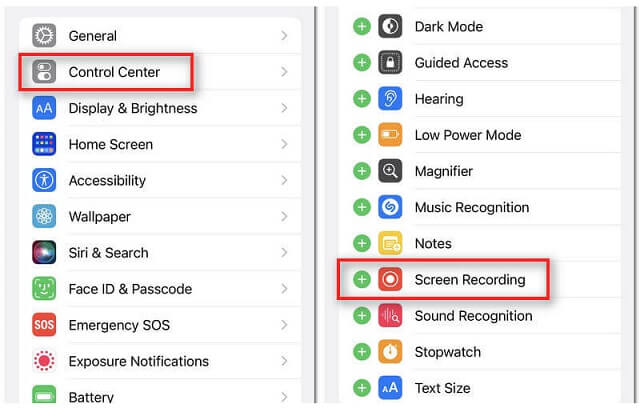
Step 1. If you are using iOS 14 or later, you can go to the Settings app, scroll down, and find Control Center.
Step 2. Then find Screen Recording from the MORE CONTROLS list. There should be a Plus icon in the front of the option. Tap on it, and you have added it to your Control Center.
1.2 Create a Screen Recording on iPhone
If you have Screen Recording in your Control Center already, please follow the steps below.
Step 1. First, you need to open Control Center on your iOS device. Normally, you can open it by swiping down from the top-right edge of your phone screen. But if you are using an iPhone with a home button, you may need to swipe up from the bottom of the screen.
Step 2. Once you enter Control Center, you should see a gray Record button. You can simply tap on it to start recording without your voice. But if you want to add your narration and record screen with video and audio at the same time, you should touch and hold the button till you see the Microphone option. Then turn it on.
Step 3. Hit Start Recording, and there will be a 3-second countdown. After that, you can open the app/page that you want to capture and make the recording video as you like.
Step 4. You can go to Control Center and tap the Record button again to stop recording. Or, you can tap on the red status bar at the top-left corner of your screen and then select Stop. The recorded video will be saved to the Photos app on your iPhone.

There are also a lot of screen recorder apps in App Store. But most of them need the help of Apple’s Screen Recording feature to complete the recording.
So, it is not suggested to download them since the built-in tool can meet your basic needs. You can share your recorded videos on social media platforms too.
Method 2: Record iPhone Screen With Windows/Mac
But you should know that not all apps and content can be recorded using the default way. And some apps may not let you record audio.
Also, the iPhone screen can be too small to read when recording. That must be annoying. In that case, you may try to record your iPhone screen with your computer. And it will be much easier if you need to edit the recording and share it on social media.
There are plenty of recording tools for Windows and Mac, such as OBS and Bandicam. But we are going to share a new program called Aiseesoft Screen Recorder. It is quite friendly to those who want to record the phone screen.

Procedure:
Step 1. Download and install the program from the official website. Launch the software, and you will see a Phone option in the main interface. Click on that option and select iOS Recorder on the pop-up window.
Step 2. Please make sure your iPhone and computer are under the same WLAN. Then you can mirror your iPhone screen to the computer: open Control Center > tap Mirror > select Aiseesoft Screen Recorder as an output device.
Step 3. Once connected, your phone screen will be displayed on the computer immediately. You can start recording then. You can stop at any time. By the way, it allows you to trim and edit the recording before saving it, which is helpful when you are making a video tutorial for YouTube, Facebook, etc.
You can use any other (maybe your favorite) recording software as well to accomplish this task. Moreover, if you don’t want to put an extra burden on your PC, you can simply utilize free online screen recorders too.
Some Recording Tips
Here are some tips for you when recording your screen on your iPhone:
- When you record the screen on your iPhone, please make sure you have enough storage capacity. Otherwise, the video recording may stop at any time when you make a very long recording.
- It would be better if you change the wallpaper and create a new page on your home screen if you don’t want others to know.
- Turn on Do Not Disturb mode: Settings > Focus > Do Not Disturb.
- Unmute your iOS device if you want to capture the audio coming from your device.
- Turn off in-app music if you don’t want it.
Conclusion
Hope that you have created a great recording video through the methods we mentioned above. You can choose any recording method to meet your need.
And if you found this post helpful, you can share it with your friends or followers so that they can also get benefit from it.