Windows 10 provides you many privacy settings since Microsoft doesn’t compromise on the user’s privacy.
Google, WhatsApp, Facebook, etc. track your activities and use this information for advertising. Similarly, Microsoft keeps an eye on user’s activities.

But one thing that takes Microsoft Windows a step further since it provides you an opportunity to disable these privacy settings.
Many users are unaware of these settings. You must know and disable it if you don’t want to be tracked which is recommended.
So, I will guide on windows 10 privacy settings to turn off immediately.
Windows 10 Privacy Settings to Turn Off
Deactivating these settings will not affect your computer performance whether it will enhance.
You will feel improvement in your laptop battery timing as well.
You will be surprised to know about the data that Microsoft stores for advertising.
So, make sure to read and follow each setting carefully. Let’s dive into it.
Also Read: How to Install YouTube on Windows 10?
Windows Permissions Privacy Settings
First, we will disable some important privacy options in the windows 10 settings.
1) General Privacy:
Windows tracks the activities of your apps and software you have installed on your PC and tracks its activities to show the relevant ads.
To disable these settings, follow the given steps:
- Go to Windows Settings > Privacy
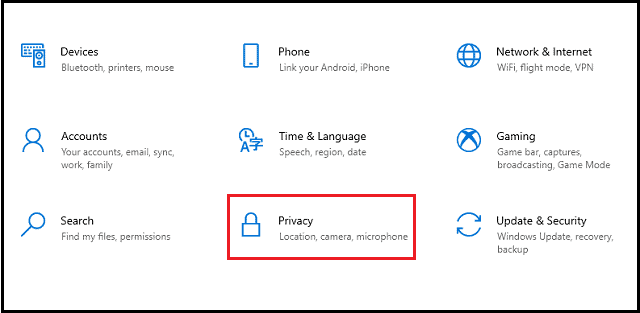
- Navigate to the General Tab to the left side.
- On the right side, disable these four options.
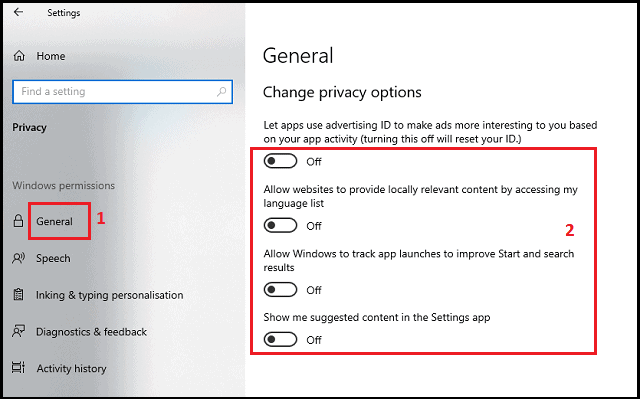
Now, Windows will not track your software data. You can enable it anytime you want.
2) Speech Privacy
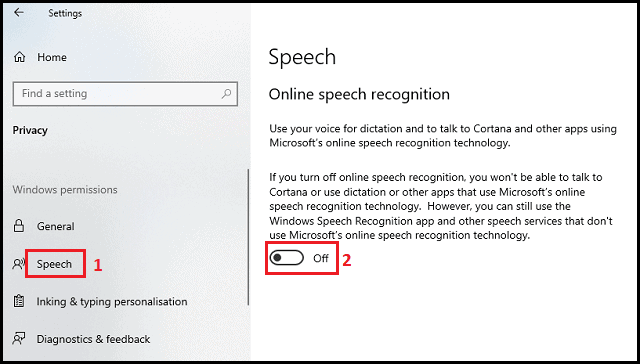
Windows stores your voice data what you speak using Cortona, any app, etc. We need to disable it as well.
Under the General tab, you will find the Speech option on the left side in privacy settings. Just disable it as well like below:
Also Read: How to Change Drive Icon in Any Windows Operating System?
3) Typing History
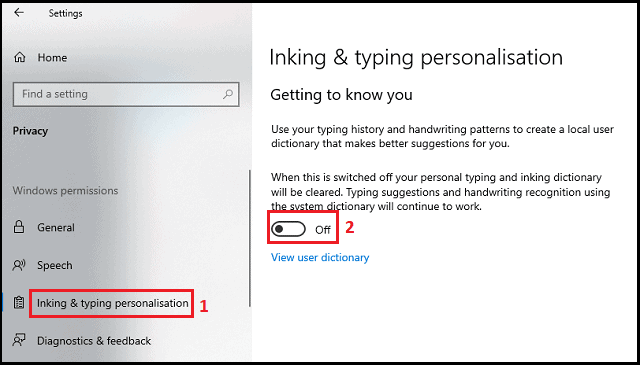
Microsoft even stores your typing history data for advertising. Although Microsoft includes many features in Windows but there is a logic behind it.
Now, we will disable it as well to enhance our privacy. Under the Speech tab, you will find Inking and typing personalization. Disable it with a single click like below:
4) Diagnostics and feedback
This is a very important privacy setting you should turn off. Windows automatically sends a report to Microsoft about the app’s usage, history of browser, and much more.
To disable these settings, follow the given procedure:
- Navigate to the Diagnostics and feedback tab under Inking and typing personalization.
- Select the Required diagnostic data instead of Optional diagnostic data. Some settings will auto turn off after doing this.
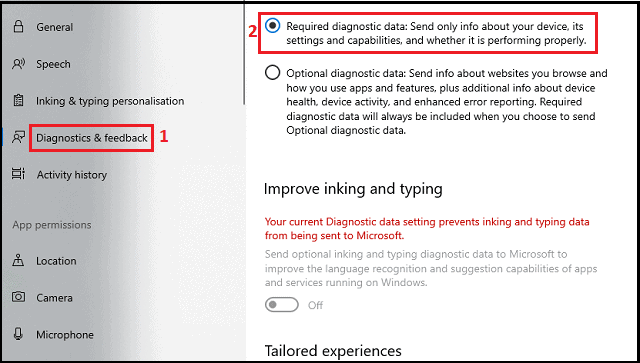
- Scroll down and disable Tailored Experiences. Also, hit on Delete button to remove the previously stored data.
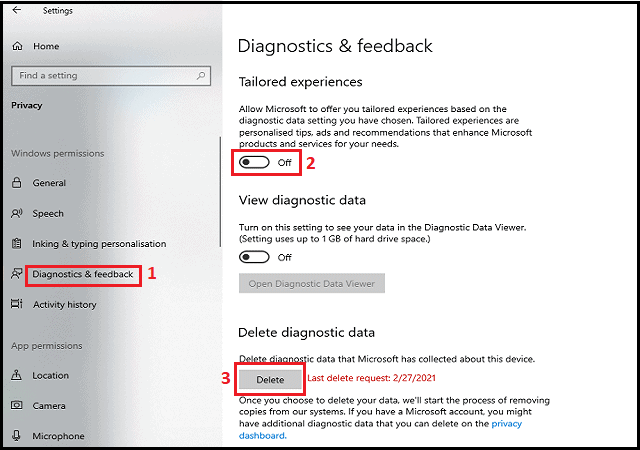
- Again scroll down and select Never from the drop-down menu of Feedback frequency.
- That’s it.
Also Read: How to Open The Task Manager on Windows 10? – 12 Ways
5) Activity History
Now, we will control the activity history in the settings so that we can’t be tracked by Microsoft.
Follow the given steps:
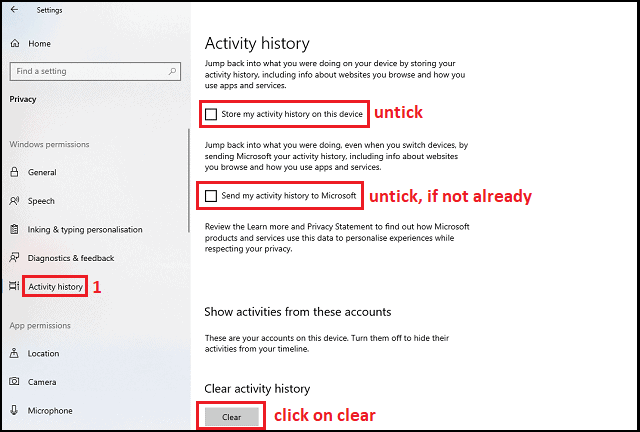
- Go to Activity History under the diagnostics and feedback tab
- Untick store my activity on this device, you can read yourself
- If the second option is already ticked then, untick it as well.
- At last, click on the Clear button to delete the previous activity.
Windows Permissions Privacy Settings
Now, we will control the apps by using different resources like camera, location, video, etc.
You have to keep these settings according to your taste. So, lets begin:
1) Location
Location section in the privacy settings, you can set which app can utilize your location or you can turn it off manually by clicking on change and then, turn it off.
If you use location then, you can restrict certain apps as well.
Now, make the changes according to you. If you use a PC then, I suggest you disable it. In the case of a Laptop, restrict some apps.
2) Camera
The same is the case with the camera settings. You can turn it on for some apps.
It must be turned off permanently for desktop systems with no camera. You can turn it on for the laptop.
Windows 10 automatically turns on the camera, location, video, etc. for certain unnecessary apps.
You have to turn off hardware resources for unimportant apps.
Also Read: How to Do Emojis on Windows 10?
3) Microphone and Voice Activation
There are certain apps on which you utilize your microphone. Just allow those apps and turn off for rest of the unnecessary apps.
Under the microphone tab, you will find voice activation settings. You can setup this according to your microphone settings.
Voce activation setting will automatically turn off if the microphone is off.
It will be a beneficial for you. Your system resources will not be used.
4) Notifications and Account Info
Many apps and software release the notifications on your system which is very annoying.
You can turn off this settings to avoid website notifications and I suggest you to do it.
Under the notification, you will see the Account Info. If you use Microsoft account on your device then, you can turn off other keep this turn off.
5) Contacts
I keep this setting turn off since I don’t need contacts on my computer system.
You can disable it permanently or for some apps. These apps will be allowed to access your contacts.
6) Calendar
You can turn off calendar if you want. I don’t want any app to access my calendar therefore, I prefer to turn it off.
If you want to allow for some apps then you can otherwise keep this off.
7) Phone Calls and Call History
In Phone calls section, you can turn it off for all apps since we make calls on our smartphones not on PC or Laptop. If you use then, you can turn on.
Similarly, I don’t allow any app to access the call history. You should turn it off.
Also Read: 5 Best Fast Web Browser For Windows 10
8) Email
You can choose which app can access your email. I personally don’t recommend to turn it on.
If we do turn it on, any app can access the email and will send the promotional emails which I don’t want.
9) Tasks and Messaging
Now, these are not very important settings. You can make changes according to your taste.
Usually, I will want to keep this turn off since I don’t allow any app to access the tasks and message.
10) Radios
You can keep this setting turn off since it is not necessary.
Alternatively, you can allow some apps to access radio. I keep this turn off.
11) Other devices
If you turn on this setting then, the selected apps will be allowed to share data with wireless devices.
I don’t want it so I will deactivate this option. You can activate it if you want.
12) Background Apps
This setting can be very important for almost every user. You can allow some apps to run in the background.
It will consume your laptop battery and I don’t want it.
It will reduce the system performance. So, I recommend you to turn it off or for some apps.
13) App Diagnostics
If you activate this setting, the selected apps will be allowed to access the diagnostic data on your system.
As we have disabled the diagnostic settings earlier so we will disable it as well.
14) Automatics File Downloads
Windows automatically downloads the new files if you use OneDrive on Windows 10
You should turn it off if you want to stop OneDrive from downloading files. In this way, you can save your data.
It must be turned off if you don’t use OneDrive on Windows 10.
15) Documents, Pictures, Video, and File System
These sections mean the apps will be unable to access the documents, pictures, videos, and file available in your system.
I suggest you enable it only for specific apps and disable it for the rest of the software.
Also Read: 7 Best Free VPN Extension For Chrome in 2020
Final Verdicts
The privacy of all users is very important and one must not compromise on it. If you are really serious then, you must follow the above procedures.
If you think that this guide is helpful then share with your other windows user friends.
You can subscribe to the newsletter so that you can receive these types of informative articles.
